
- de
- en
Table of Contents
Multilingual Surveys
In a multilingual survey project, the questionnaire is available in several languages. Depending on the participant, the same questions are then displayed in the appropriate language.
In the List of Questions, translations are stored for all visible texts (e.g. questions, answer options, text elements, scale labels, error messages).
When the questionnaire is filled out, there are several ways to select the right language:
- Different links can be used for the different language versions (URL to the Questionnaire).
- If the serial mail function is used, a language can be stored for each address entry.
- If no language has been specified in the link, in the address entry or in the questionnaire settings, the participant is offered a selection of language versions when calling the questionnaire.
Important: Each question can contain multiple language versions (more on this in this chapter). Do not create copies of questions, sections or text elements for a new language version.
Creating a Multilingual Survey Project
First, create the list of questions and the questionnaire. The language in which the survey project is originally created is called the base language in the following.
Now select the function Add another Language in the Project Settings.
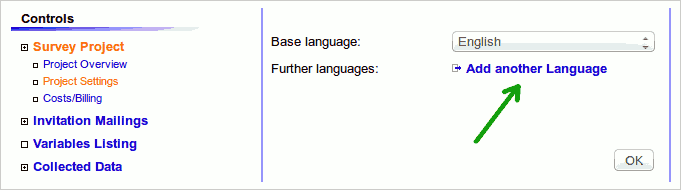
Now click the language into which the questionnaire shall be translated. As soon as more than one language is active in the survey project, a new menu item Language Versions appears under Control.
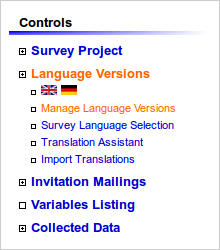
Under Manage Language Versions, you can select in future which language version you see first when editing the list of questions (more on this below). Now select the language you have just added.
Tip: If the menu item Language Versions is not open at the moment, move the mouse pointer over it and wait a moment for the menu to open. Then you can conveniently switch the language version for editing with the language symbols.
Translating the List of Questions I
In the Control menu, select the menu item Language Versions → Translation Assistant. Every text that appears in a question, an item or a text element is listed here. The base language is shown on the left, the active language version on the right. If the base language is currently active, the first available language version is displayed.
Simply enter the translations on the right and save (at the bottom). To save time, you can use the button Translate automatically (if the server supports this) – then you only have to iron out the weaknesses of the automatic translation.
Tip: If you notice errors in the base language while editing: Changes on the left side are saved as well.
Translating the List of Questions II
If the translation shall be done externally, the menu item Language Versions → Import Translations helps. Here you can export all texts of the questionnaire as a table (CSV file), translate them externally (e.g. hand them to a translation agency), and then import the translations again.
Proceed as follows:
- Language Versions → Import Translations
- In the area Export Texts, make the necessary settings and then click Download
- You will receive a CSV file that you can open with almost any spreadsheet software (e.g. OpenOffice Calc, Excel). If you are asked for the format:
- Encoding/character set: Unicode (UTF-16 LE)
- Separated by tab
- Text delimiter is the double quotation mark (
“)
- Save the table in a format of your choice and send the file to the translator
- Important: During the translation, the left column of the table must not be changed. It is used to assign the texts. Also, no changes should be made in the questionnaire.
- Save the table with the translations as a CSV file again
- Note: It is not quite easy to save international characters in UTF-8 encoding with Excel. If you use Excel and need non-Western European characters, save as “Unicode (*.txt)” and import this file with the encoding “UTF-16LE” (Separator: “Tab”). It is more reliable to open the Excel file with the freely available OpenOffice Calc and save it as CSV – on macOS, this works similarly with Numbers (iWork Suite).
- Language Versions → Import Translations
- In the area Import Translations, select the CSV file and specify whether already existing translations shall be updated.
- Note: If nothing is entered for a translation (right column) in the translation table, this row is ignored during the import. Existing translations are therefore never deleted.
- After clicking Import, you will be asked for the format of the CSV file. Normally, SoSci Survey recognizes the format automatically and you only have to confirm.
- If the first row of the translation table does not contain the three-letter language codes of the respective language versions, SoSci Survey asks for the languages of the table columns.
- After confirming with Import, the translations are read and saved in the survey project.
- If texts have been changed in the table or in the survey project, an assignment may no longer be possible. If necessary, SoSci Survey shows a list of texts after the import that could not be assigned.
- If a text cannot be assigned 1:1, SoSci Survey first removes quotation marks and spaces in the reference text, then punctuation and HTML tags, to find the matching text. After the import, check under Language Versions → Translation Assistant whether HTML tags need to be added.
Translating the List of Questions III
- Now open a question in the list of questions. From now on, a country flag always appears next to text input fields. It symbolizes the current language version.

- Click the flag to display the original text.

- With the flags, you can switch between the language versions for this text element.
Important: The flag does not set the active language version. It only determines for which language version you are currently entering text in this input field. The element stores all texts that you enter for the different languages – which text is then displayed in the questionnaire depends on which language the participant selects or which language you specify in the questionnaire.

- Regardless of the language version in which you are currently editing the project, you can make changes to any language version at any time (the only exception is Footer and Logo). When you save the question, all language versions of the question are updated automatically.
- At the bottom of each question, you see the items or answer options of the question. Please note that the classic quick entry is only offered if you have set the base language under Language Versions → Manage Language Versions and activated the language to be edited (recognizable by the pencil symbol). In translation mode, a translation assistant for the items or answer options appears. The base language is shown on the left, the editing language on the right.

You can now translate the list of questions step by step. Simply leave the original text expanded so that you always have it in view. The Translation Assistant (in the menu Language Versions) allows you to do the translation even faster. It shows the existing texts, empty fields for the translation and, if desired, a raw machine translation.
Using the Language in the Questionnaire
In principle, you are done after the translation. If you have already composed a questionnaire, it now supports both language versions. You have three options for the selection:
- You can select a language in the settings of the questionnaire (Compose Questionnaire, tab Settings). The questionnaire will then always start in this language.
- You can specify a language in the link to the questionnaire (see The Link to the Questionnaire). You will find the three-letter codes for the individual languages under Language Versions. By the way, the codes correspond to ISO 639-2 (bibliographic variants). If you specify a language in the link, it takes precedence over the language set in the questionnaire.
- You can specify no language in the questionnaire settings (“Offer selection”) and no language version in the link either. Then the participant sees a selection of the available languages at the beginning of the survey. You can manage the exact display and texts of this selection under Language Versions → Survey Language Selection.
Hiding Answer Options or Items
It may happen that different answer options shall be available in one language version than in another.
This is achieved by hiding the unnecessary items. An item or answer option is hidden by prefixing it with a tilde (~). In the base language, the text should nevertheless follow, because it is used for labels in the data set. In the translation, it is sufficient to insert just a tilde.

Note: If you actually want an item to start with a tilde, simply prefix it with two tildes (~~); the item is then displayed and starts with a tilde.
Controlling the Language Dynamically
If you want to change the language during the survey, the PHP functions getLanguage() and setLanguage() are available. With these functions you can, for example …
- dynamically hide entire questions in individual language versions.
- control the order of items depending on the language.
- build your own language selection.
Non-Western Languages
The standard Western fonts may not contain all the characters you need for Chinese, Japanese, Indian, Persian, Hebrew, etc. The simplest solution is to add fonts with the appropriate characters in the Questionnaire Layout under General Settings for the fields Default font and Font for input fields. For Simplified Chinese, the list of fonts could then look something like this:
Arial, Helvetica, tahoma, verdana, 宋体, SimSun, 华文细黑, STXihei, sans-serif
In this example, the Western fonts are additionally listed first. This can be useful, but does not have to be. It makes a difference especially when Western and non-Western characters are mixed in the questionnaire.
You may, however, also want to use a different font for the complete questionnaire (but only for a single language version). So, e.g., “Arial” for the German version and “Sim Sun” (宋体) for the Chinese language version.
In this case, adjust the predefined text element Layout: HTML-Code in <head> under Text Elements and Labels. Store the following HTML/CSS code for the Chinese language version:
<style type="text/css">
body,
textarea,
input,
select {
  font-family: 宋体, SimSun, 华文细黑, STXihei, sans-serif;
}
</style>
For other language versions, you can of course store other definitions. If you do not specify anything, the definition from the layout is used.
Language Selection
There are several ways to select a language for the interview:
- You can specify a language under Compose Questionnaire in the Settings tab.
- You can add a language parameter to the link.
- If you work with serial mails, you can specify a language in the address entry.
If the language is not specified by any of the above options, SoSci Survey by default shows a selection of the available languages, symbolized by flags, when the questionnaire is called.
You can customize this selection under Language Versions → Survey Language Selection. For each language, a short HTML code with placeholders is stored there.
<div class="option">
    <a href="%link%">
        <div class="flag">%flag%</div>
        <div class="desc">%lang%</div>
    </a>
</div>
The placeholder %link% ensures that the language selection works, %flag% is replaced by a flag and %lang% by the name of the language in the respective language.
If you do not want to display any flags, you can simply remove the line with %flag%, if necessary for each language.
<div class="option">
    <a href="%link%">
        <div class="desc">%lang%</div>
    </a>
</div>
If you want to display a different label, replace %lang%, e.g.
<div class="option">
    <a href="%link%">
        <div class="flag">%flag%</div>
        <div class="desc">Boarisch</div>
    </a>
</div>
If you want to use a different flag, upload it under Images and Media Files (do not use the protected file storage) and add an <img> tag pointing to the image file. The CSS class s2t-flag ensures correct scaling.
<div class="option">
    <a href="%link%">
        <div class="flag"><img src="bavaria.png" alt="Boarisch" class="s2t-flag"></div>
        <div class="desc">Boarisch</div>
    </a>
</div>
To sort the languages differently, prefix a comment with the desired position.
<!-- 2 -->
<div class="option">
    <a href="%link%">
        <div class="flag">%flag%</div>
        <div class="desc">%lang%</div>
    </a>
</div>
Optionally, you can also specify a Text Introducing the Language Selection, which is displayed above the flags.
Replacing a Flag
The preset flag is not always suitable to symbolize a language. If, for example, you offer Traditional Chinese but want to use a different flag for Taiwan, proceed as follows:
- Search Wikipedia for the appropriate flag, click it and then use the download symbol to download the flag in the format “small”.
- Upload the file in SoSci Survey under Images and Media Files in the tab Upload images; do not check the option “Use protected filing”.
- Click the image after uploading; this displays the file name in the text input field below the images. Copy it into a free text field (e.g. a note in Notepad++), you will need it in a moment.
- In the navigation of SoSci Survey, open Language Versions → Survey Language Selection. The field next to the language whose symbol you want to change should contain the following HTML code:
<div class="option">
    <a href="%link%">
        <div class="flag">%flag%</div>
        <div class="desc">%lang%</div>
    </a>
</div>
- In this HTML code, replace the placeholder
%flag%
with the following HTML code
<img src="flag_just_uploaded.png" alt="%lang%" class="s2t-flag">
Instead offlag_just_uploaded.png, insert the file name you noted before. Theclass="s2t-flag"in the HTML tag is important. The result could then look as follows.
<div class="option">
    <a href="%link%">
        <div class="flag"><img src="flag_just_uploaded.png" alt="%lang%" class="s2t-flag"></div>
        <div class="desc">%lang%</div>
    </a>
</div>
- Below, you will see a second input field that only contains the HTML code
%flag%. Replace the placeholder there with the following HTML code.
<img src="flag_just_uploaded.png" class="langSymbol unselectable" style="width: 30px; height: 18px;" alt="ger" title="%lang%">
- Save the changes (
 ).

