
- de
- en
Table of Contents
Quota Control
When working with panel providers, quota-based samples are often commissioned. The questionnaire is responsible for quota control: once enough completed questionnaires have been collected for a particular quota group, any further participants from that group are redirected to a ‘QuotaFull’ address provided by the panel provider.
Note: For other forms of recruitment, a quota cap is generally not advisable. The result would be that the majority of interested participants would be turned away – whilst at the same time you would still need to recruit more people to ensure that the missing demographic groups are represented.
Overview
- Create a “Panel Redirects” module and enter the redirect URLs you have received from the panel provider; you must include at least one URL for “QuotaFull” and one for “Complete” (Panel-Redirects).
- If you first need to recode the variables for quota allocation (e.g. recode an open-ended age response into categories), create a ‘Decode Responses’ module and enter the original variables and the rules for recoding there.
- Create a ‘Quota’ modules, select the characteristics to be used for quota allocation, and, after saving, enter the quotas for each quota group. Leave the ‘Number’ field blank if respondents in the relevant quota group are to be screened-out immediately (screen-out).
- Drag the “Panel Redirects” module under Compose Questionnaire onto the first page of the questionnaire, and the ‘Quota’ block (and, if necessary, modules for recoding the responses) onto the earliest page on which participants are to be screened-out once the quota group is full.
- Insert an additional page before the ‘Last Page’ of the questionnaire, drag a ‘PHP Code’ element onto the page and enter the following PHP code:
setStatus('complete'); - Publish the questionnaire (Set the Survey Administration Period) and open the “Panel Redirects” block you created at the start. Check this block to see what the “Link for the panel” is (including the parameters for the panel ID) and provide this link to the panel provider.
- Open the quota allocation module and, if necessary, reset the quota count to 0 (right-hand column). In this block, you can also check during the survey how many people per quota group have already completed the questionnaire.
Important: The screen-out for unsuitable participants only works if you have entered a screen-out URL in the ‘Panel Redirects’ or selected a text for the screen-out.
Important: Please use the ‘Panel Redirects’ module for redirects. If you wish to use the redirect() function instead, add the line setStatus('complete'); above it so that respondents are counted towards the quota.
Counting and Screen-Out
If your quota attribute question allows a ‘no answer’ option, you can also enter a number for this in the quota block.
- If you enter a number, the corresponding number of participants who select ‘No answer’ will be allowed to take part.
- If you do not enter a number, a screen-out will take place. This means that either the screen-out redirect specified in the Panel-Redirects module will be used, or the screen-out text selected there will be displayed.
All cases are counted for quota allocation where (a) the quota allocation module has been used and (b) the status (STATUS) is COMPLETE or FINISHED (and not STATUS).
- If you wish to count separate quotas in different questionnaires, create a separate “Quota Allocation” module for each questionnaire.
- If you add the quota calculation at a later stage, only cases from that point onwards will be counted – adjust the count in the module manually if necessary.
- If you link several questionnaires using a Multi-Level Structure or
goToQuestionnaire(), the “Panel Redirects” and “Quota” are only required once, usually in the parent/first questionnaire. CallingsetStatus()will then also work in a child/subordinate questionnaire.
Independent and linked quotas
If you use more than one characteristic for quota allocation, there are two options: you can either define separate (independent) quotas for each characteristic, or you can define quotas for all possible combinations of the values of the two characteristics (linked quotas).
If you define several characteristics in the “Quota” module, linked quotas are checked.
If you create several “Quota” modules and select one characteristic in each, the quotas for the characteristics are checked independently of one another. In this case, under Assemble Questionnaire, place all quota modules (one per characteristic) in the questionnaire.
As a rule: with two characteristics, linked quotas are generally advisable; with three or more characteristics, linked quotas may be difficult to meet. Clarify with the panel provider in advance what you need and what you are paying for.
Completeness check
By default, cases are counted for quota allocation when the command setStatus(“complete”) is called, i.e. at the end of the interview.
If many participants are completing the questionnaire at the same time, it may happen that they are all initially accepted – as the quotas have not yet been counted – and that the quotas are exceeded once they reach the end of the questionnaire. However, panel providers usually have enough experience to avoid such situations.
Early counting
You can trigger the count on an earlier page by placing the following PHP code there.
setStatus('quota count');
Filtering out invalid cases
You may wish to exclude participants whose responses do not meet certain criteria. Ideally, you should receive a “Low Quality” or “Quality Fail” redirect from the panel provider for such participants and have entered this in the “Panel Redirects” section.
Place the following PHP code in a suitable location (e.g. on the page with a control question in the ‘Processing responses using PHP’ section or at the very top of the next page as ‘PHP code’), to filter out cases where the instructed-response item SK01_04 was not answered with the value 1 or the item SK03_05 was not answered with the value 5.
if (
  (value('SK01_04') != 1) ||
  (value('SK03_05') != 5)
) {
  setStatus('quality fail');
}
To screen out cases where the questionnaire was completed in less than 5 minutes (300 seconds), you would place the following PHP code above the setStatus("complete") line.
if (caseTime('hitherto') < 300) {
  setStatus('quality fail');
}
Adjusted Quota Allocation
Not all respondents complete the questionnaire correctly. This section explains how to manually adjust the quotas.
In the dataset, you will find a variable named _GRP under the identifier of the quota allocation module. If your module has the identifier QT01, the variable is called, for example, QT01_GRP. This variable stores a number or an abbreviation for the quota group.
- Download the dataset.
- Clean the dataset.
- Generate a frequency distribution for the variable mentioned above.
- Enter the number of valid cases for each quota group in the quota module.
Response statistics for panel providers
When a quota-based sample is provided via a panel provider, the provider usually requires feedback on which quota groups are still missing respondents.
If you open the ‘Quota’ element in the questionnaire for editing, you will find a section titled ‘Quota statistics for third parties’. A URL is displayed below this. If you provide the panel provider with this URL, they can check the current quota counts at any time.

If you are using several elements for (independent) quota allocation, each element uses its own URL. In this case, please provide the Panel Provider with several URLs.
Note: Please bear in mind that the quota counts displayed may also include invalid cases. If you clean up the quotation, the displayed case numbers will change accordingly. Make the corrections promptly and inform the panel provider of this to avoid any misunderstandings.
Counting without quota allocation
The Quota Statistics for Third Parties function can also be used, if desired, to provide third parties with the response data independently of any quota allocation. Note: This is a special case where a sample is collected without quota allocation.
- Create an internal variable,
- click on the variable (not the parent question of the “Internal Variables” type) on the left-hand side of the question catalogue,
- set the ‘Content type’ to ‘numeric codes’ and
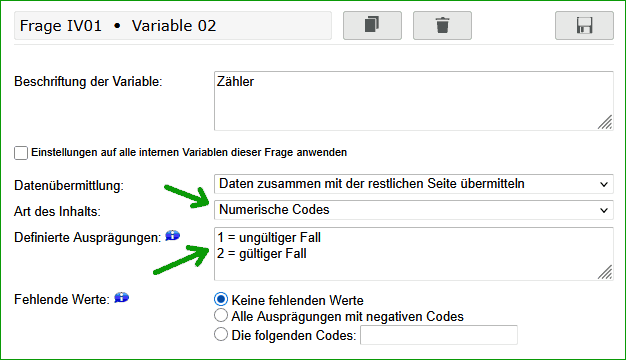
- enter two codes for valid and invalid cases.
- Make a note of the internal variable ID; this is usually a 7-digit ID (e.g. “IV01_01”).
- Create a “Quota” element to define quotas for this variable. The limits should be set high enough to ensure that no cases are rejected, unless this is intentional.
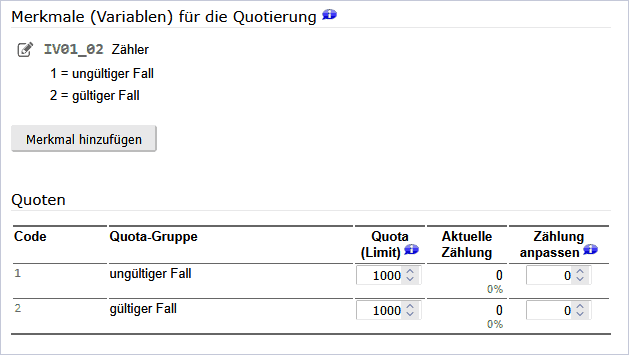
- Under Compose Questionnaire, insert PHP code in the appropriate place to populate the internal variable with the code for valid cases and, where applicable, for invalid cases as well.
put('IV01_01', 2);
Insert the ‘Quotation’ element below this PHP code. The internal variable is not included in the questionnaire; it merely makes the variable available in the data record.
The ‘appropriate point’ could be, for example, after a screen-out, but it could also be right at the start of the questionnaire if necessary. By default, the quota only counts cases that have been completed or marked as complete using setStatus().
Third parties can now view the quota counts at any time using the statistics URL displayed in the Quota element.
Search Terms: Quota, quota queck, redirects, panel, Panel providers, monitoring link, monitoring URL.

