Inhaltsverzeichnis
Amazon MTurk
You may want to recruit respondents using Amazon Mechanical Turk (MTurk).
Warning: We must assume that worker IDs are personal data. That means that restrictions from the GDPR (see Personal Data) may apply. Therefore, if using individual codes or retrieving the worker ID, please make to check the procedure with your local data protection officier (DPO).
Display a Code
According to the official documentation of Amazon, you should provide an ID at the end of your questionnaire that the workers must enter in the MTurk form.
Of course, you could display some fixed code, if respondents comply with your quality check criteria.
if (caseTime('hitherto') > 600) {
  html('<p>The survey code is <strong>12345678</strong></p>');
} else {
  html('<p>Sorry, you did not complete this survey sufficiently carfully.</p>');
}
Yet, you probably want to provide individual codes in order to prevent workers to share codes. Please follow the manual Display Individual Codes or Coucher Codes to provide individual codes.
Using the official code solution, however, will give you some additional work to assign which workers have earned the HIT, and which not.
Copy the Worker ID
When you create a new MTurk task, using the “Survey Link” template, you can modify the code in order to send the worker ID directly to your data set.
MTurk Task
In the Amazon MTurk Requester management, please select Create → New Project and then start with the template Survey → Survey Link. Click Create Project to get started with the details.
In the first tab of the Amazon MTurk form, please enter all the data (Title, Description, …)
In the second tab “Design Layout” then click the “Source” button in order to see the HTML source code of the design.
In the source code, you need to make two modifications. First, at the very beginning, under the <meta> tag, add one line to embed some JavaScript (additional line is set in bold).
<meta content="width=device-width,initial-scale=1" name="viewport" /><script src="https://www.soscisurvey.de/script/S2AmazonMTurk.js"></script><section class="container" id="SurveyLink">\\ |
The second modification, then, is to add the following <script> that will write the survey URL with the appropriate parameters. Please find <label>Survey link:</label> and in the next line, replace the contents of the <td> tag as follows:
<tr><td><label>Survey link:</label></td><td><script>provideWorkerLink("https://www.soscisurvey.de/example/", "Click here to Take the Survey");</script></td></tr> |
The first parameter in the function provideWorkerLink() is the URL of your survey.
The second parameter is the text to display for the link.
You can decide whether to still ask for a “survey code” or not. If you do not want the survey code, just remove this line:
<div class="form-group"><label for="surveycode">Provide the survey code here:</label> <input class="form-control" id="surveycode" name="surveycode" placeholder="e.g. 123456" required="" type="text" /></div> |
After making these edits, hit the “Source” button again and edit the other texts, for example the study description.
Note: In the preview, you will not see the link, but only “The link will be displayed after you accepted the HIT.”
Addition in SoSci Survey
By default, the code above will store the worker ID as reference (variable REF). You can additionally store the assignment ID and the HIT ID.
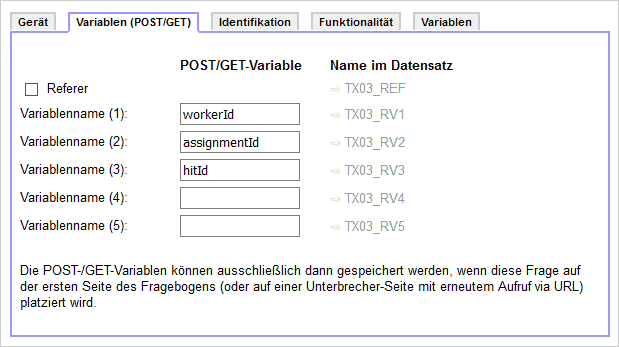
In SoSci Survey, create a question of type Device and Request Variable. In that question go to the tab Variables (POST/GET) and enter the following GET keys to be stored:
- WorkerId
- AssignmentId
- HITId
Store this question and place it on the first page of your questionnaire.
Approve HITs
You will probably clean your data set, for example based on instructed response items (very good), bogus items (also good) and/or response times (fair, consider using TIME_RSI).
You have the worker IDs from all the remaining records that comply with your quality criteria. Of course, you could check all assignments in MTurk manually, but that takes a lot of time. Better work with a CSV file.
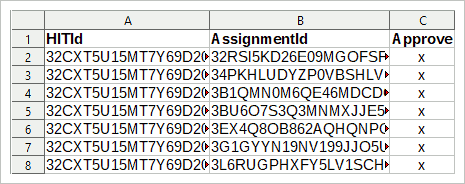
For the CSV file, you need the HIT ID and the assignment ID. If you followed to manual above, you will have these data available. Then, create a table (with R, SPSS, LibreOffice Calc, Excel, …) with three columns from your data: The first column contains the HIT ID, the second column contains the assignment ID, and the third column must contain an “x” for every entry.
The first line of the table is the header, the variable names. Make sure that the variable names are as follows (case-sensitive):
- HITId
- AssignmentId
- Approve
Then store the table as CSV file and in MTurk → Manage → Review Results click the Upload CSV button. Select the newly saves CSV and confirm. MTurk will then ask you whether to accept these assignments.
When you're done, only those assignments shall remain that did not match you quality criteria. Reject them, explaining why.
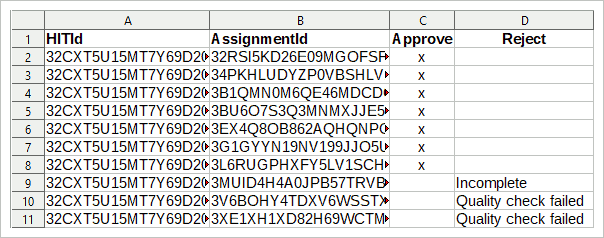
Alternatively, do not delete the records immediately during data cleaning, but mark them. You can then upload a CSV file with four columns, the forth named “Reject” and with an explanation for the rejection in the column. This will make sure that you do not reject anyone whose ID got lost.


